Thursday, July 26, 2012

Cumulative Update 2 for System Center 2012

Microsoft had recently release the Cumulative Update 2 (CU2) for System Center 2012.   Part of  it, it fixes the issues for Data Protection Manager 2012 (DPM 2012), Orchestrator (SCO 2012), Operations Manager (SCOM 2012), AppContoller and Virtual Machine Manager (SCVMM 2012).

Most of the fixes are for the SCDPM and the SCVMM.

The Descriptions of bug fixes are in this link.

But if you want to download the CU2 only for the SCDPM 2012 then go to this link directly.

Note : Remember to backup your DPM database before you perform this rollup update.

The issue of the VM Status of Unsupported VM Configuration (Error 644) is resolved with the patch for the SCVMM and SCDPM.

keywords : DPM 2012, KB2706783, VM status of unsupported VM configuration (Error 644), error 644, VMM,

Thursday, July 19, 2012

VMM - VM status of Unsupported VM Configuration (Error 644)

I had provisioned a Standard W2K8R2 VM with the System Center Virtual Machine Manager (SCVMM) 2012.  Once installation is done, I attached the DPM ISO (with Share image file instead of copying it – tick in the box) to install through the VMM.  Everything went successfully, till I wanna detach the ISO.  I tried to detach the ISO but in vain through the VMM.

Error Message (Error 644) :

The specified host drive \\domain.local\Library\ISOs\SCDPM2012.iso does not exist on the host machine.

After some "bing”, it seems that it’s a common problem.  Steps carried our is as below :

  • Launch the Hyper-V Manager in that particular server that is hosting the VM. 
  • Detach the ISO or DVD, in the Settings for that particular VM and click Apply and then OK.
  • Then go back to the VMM, refresh it and the error “Unsupported VM Configuration” is no longer there.

Source from TechNet

Hope the above steps helps.

keywords :

Virtual machine configured to use an ISO has a status of Unsupported VM Configuration in System Center 2012 Virtual Machine Manager, VMM 2012,

Tuesday, July 17, 2012

DPM–DPM Agent “Unavailable”

I would like to share with all that I had experienced the  DPM Agent is “Unavailable” many times.  Even though after uninstall and reinstall it, the next few hours later the Agent Status displays in the DPM Console as Unavailable.

After lots of troubleshooting, at last found that the Domain Controllers (DC) TIME was not in sync.  Therefore, after working with the AD team to sync all their DCs, the DPM Agent is all normal and status is OK.

Lesson learn from the project is to have the AD team to check on all their DCs time is in sync and the protected servers time are in sync with the DCs.

Keywords : DPM Agent unavailable, agent not available, DPM agent change to unavailable after few hours or next day

Monday, July 2, 2012

DPM–How To Enable End User Recovery

The End User Recovery (EUR) is a great feature in DPM.  However you should consider if you need this feature.  It will have an impact to your Active Directory Schema, which is some company has their schema fine tune and edited to their company needs.  So before proceeding, do discuss first with the Schema Administrator, the Active Directory Administrator, the global IT before the change is taken.
Another thing to consider before enable the EUR is the following:
  • If enable the EUR, you can’t control on what file servers EUR should be functioning.
  • You can’t control which security groups or domain users that should be able to perform the action or not
So at some point of time, some management prefer the backup administrators to do the restore rather than to let the users to do the restore.  But anyway, if you have the confident that the end users knows what they are doing, then can proceed with the EUR.
 
The pre-requisite is that the clients in the domain must be running Windows 7 or Vista with XP1, which the Shadow Copy Client software is already installed in the operating system.  EUR also supports the Windows XP with SP2, but the Shadow Copy Client software must be install or deploy to it before the users can do the recovery.
 
Firstly log into your DPM console.  You’ll realise that the End-User recovery is dimmed.
 
SC-DPM2010-43
There are 2 methods to extend the Schema to enable the End-user recovery (choose only 1 method).  Both methods requires the user with  the permission to extend the Active Directory Schema.
 
Part 1
  • Method 1 – Through the DPM Console
  • Method 2 – Through the Active Directory domain controller.
Part 2
  • Activating the End-User Recovery


Part 1

Method 1 – Extend Schema through the DPM Console


SC-DPM2010-48
Step 1.1 Click on the Configure Active Directory …


SC-DPM2010-45


Step 1.2 Enter the user credential that has permission to extend the schema in the Active Directory and click OK


SC-DPM2010-46
Step 1.3 Click Yes to confirm.


DC01-12


Step 1.4 Click OK to confirm.


DC01-13
Step 1.5 Once the schema is extended, click OK on the confirmation.

Method 2 – Extend Schema through Active Directory domain controller

Step 2.1 Log in to the Domain Controller of the domain.


DC01-2

Step 2.2 Copy the file DPMADSchemaExtension from the DPM server (copy the file to your DPM desktop).  It should be located in the C:\Program Files\Microsoft DPM\DPM\End User Recovery folder (unless it’s installed in another location but find for the End User Recovery directory). 
 

DC01-3
Step 2.3 Right-click on the DPMADSchemaExtension and Run as administrator (which also has the authority to extend the Schema).


DC01-4

Step 2.4 Click Yes to acknowledge to continue to extend the Schema as shown above.

DC01-6
Step 2.5 Key in your DPM servername e.g. SC-DPM and click OK.


DC01-7

Step 2.6 Key in the FQDN domain name e.g. systemcenter.com and click OK


DC01-11

Step 2.7 Click OK since the DPM server and the Protected server is in the same domain.


DC01-12 DC01-13
Step 2.8 Click OK to update. 
Step 2.9 Once it’s completed click OK to confirm.


Part 2

Activating the End-User Recovery

Step 3.1 Once the Schema is extended, then switch to the DPM console again.  Now you’ll be able to check the Enable End-User Recovery box.


SC-DPM2010-52


Step 3.2 Once check and click OK, then a pop-up box will appear


image


Step 3.3 Click OK.
Step 3.4 Do a Synchronization to your file server and your EUR is ready for operations.

Thank you and hope this helps you.
keywords : End-User recovery, EUR, how to get End-User Recovery activated or started

Tuesday, June 19, 2012

Booting up from VHD–Windows 2012 RC

As of today’s technology using Microsoft Windows 7 (Professional, Business or Ultimate), you can have wonders booting up from VHD (which means a single file) without meddling with your current working Operating Windows 7 System.

As of today I have here is a Windows Server 2008 R2 SP1 as the Operating System.   I’m going to share with you how I did it, to have the Windows Server 2012 RC boot up as VHD.

I referred to a couple of blogs and one of the blogs that I find it wonderful and informative is from Raymond Chow.

Here are the download list that needs to be downloaded before installation :

Windows 2012 RC http://technet.microsoft.com/en-US/evalcenter/hh670538.aspx?ocid&wt.mc_id=TEC_108_1_33 
Ultra ISO (if you don’t have utility to read ISO, then only you download and install) http://www.ezbsystems.com/ultraiso/
Install – WindowsImage Powershell Script http://archive.msdn.microsoft.com/InstallWindowsImage/Release/ProjectReleases.aspx?ReleaseId=2662

If you downloaded the ISO format, then it gives you the flexibility to prepare how much of Hard Disk space you would like to allocate for your Windows Server 2012 RC.  Of course there’s some preparation needs to be done before the VHD is build. 

However, if you decide to download the VHD ready format, then needs to jump to third part of this blog.

Part 1 – Preparation of Directory for PowerShell Script and VHD

Part 2 – Preparation of the ISO and getting VHD ready

Part 3 – Attaching the Windows Server 2012 VHD


Part 1 – Preparation of Directory for PowerShell Script and VHD

Step 1.1 Create a Directory to put in the PowerShell Script and also where your VHD (for the Windows Server 2012 RC) will reside in my example is D:\Windows8\VHD

Step 1.2 Using the Ultra ISO, abstract the install.wim to the D:\WINDOWS8\VHD directory

 Windows8-11

 Step 1.3 Copy the Install-WindowsImage PowerShell script  into the same directory.  The end result is :

Windows8-2

Step 1.4 From the Server Manager, expand to the Disk Management, create the VHD.

Windows8-3

Step 1.5 Create the VHD with Dynamic Expansion with 60GB

Windows8-4

Step 1.6 Initialize the Disk, then have it as a New Simple Volume.

Step 1.7 Next I assign it a drive letter. In my case I assign it as “W” drive.

Windows8-8

Step 1.8  End result should be like below :

Windows8-12


Part 2 – Preparation of ISO and Getting Windows Install into VHD

Next is we would like to have fresh Installation of the Windows 2012 RC into the VHD assign.

Step 2.1 Launch the Command Prompt and Run as Administrator

Step 2.2 Change the directory to where the location of the VHD and script is located.  E.g. D:\Windows8\VHD.

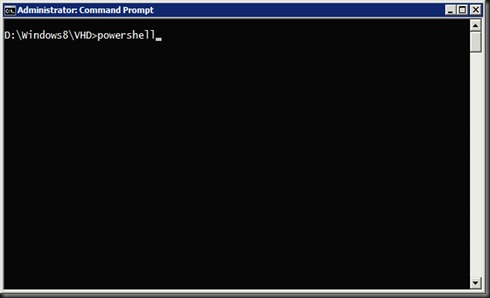
Step 2.3 Type powershell and then hit [Enter]
Windows8-17

Step 2.4 Execute the command as below :


Set-ExecutionPolicy Unrestricted


Windows8-19


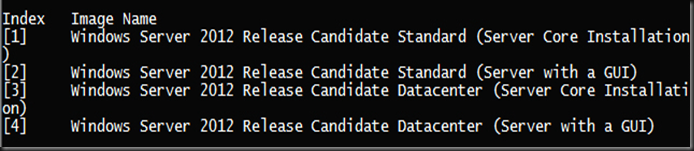
Step 2.5 Take note of the Index of the various versions that is available.
image

Step 2.6 In my scenario, I’ve choosen the Windows Server 2012 RC Datacenter (Server with a GUI), therefore the Index is 4.  The command for the PowerShell would be :


.\Install-WindowsImage.ps1 –WIM D:\Windows\VHD\install.wim –Apply –Index 4 –Destination W:
 

Only those that is in pink in colour are the ones that is needed to change accordingly.  In my case, the WIM is in D:\Windows\VHD directory. Then next is Index 4, cause I chose for Datacenter with GUI and the Drive letter that is assigned for this VHD is W.

Step 2.7 The result should be

Windows8-26

Step 2.8 Open up the Windows Explorer, should be able to see the following in W Drive.  It should be populated.

Windows8-27


Part 3 – Attaching the VHD

Step 3.1 Exit from the PowerShell

Step 3.2 Key in the command below to add into your boot menu when starting up.  Change would be in the pink colour depending on where you install.  In my example my Windows 2012 RC is installed into the W Drive.


bcdboot w:\windows
 

Step 3.3 To view the entry, key in as the following


bcdedit /v
 

The result should be

Windows8-30

Step 3.4 Dismount the drive that was use for the Windows Server 2012 RC installation (in my case is W Drive), then reboot the computer. 

Step 3.5 When computer is boot up, you’ll be presented with the Windows Server 2012 RC as a selection.

Happy trying and hope the steps is detail enough for you to begin to explore the Windows Server 2012 RC as VHD boot.  If there’s any errors please post it in this blog …. and if it’s successful ….. do post it too <grin>.

keywords : Windows Server 2012, Windows 8 Beta, Boot from VHD, Virtual Hard Disk boot, Windows Server 2012 RC

Thursday, June 14, 2012

DPM–Deploying DPM Agent to Untrusted or Workgroup Computers

In today’s session I would like to share how you can deploy a DPM agent to a computer that is not part of your domain. 

Computer Name : SC-UNTRUST

DPM Server Name : SC-DPM2010.systemcenter.com

Firstly switch to the computer that is not part of your domain.  Then map to the DPM server using Net Use command.

SC-UNTRUST-2

Next open up the Explorer and browse to the directory of the of the mapping.

SC-UNTRUST-4

Double click on the DPMRA.msi to begin the installation.

SC-UNTRUST-5

Once it’s done, it will displayed as below. Press Enter to close the window.

SC-UNTRUST-12

Open up the command prompt in Administrator mode.  Change the directory to where the DPM agent is installed e.g.


C:\Program Files\Microsoft Data Protection Manager\DPM\bin

Then execute the command to have the computer to have the computer to pre-attach to the designated DPM server with the command :


SetDpmServer.exe –dpmservername SC-DPM2010 –isnondomainserver –username UNTRUST1

The changes will only be in pink colour according to your environment.  As shown above the SC-DPM2010 is where this untrusted computer will be attach to for the DPM backup.  As for the UNTRUST1 is a unique username.  It must be a unique username for each of the untrusted computer that will be supported by the DPM server.  You can use the unique username ONCE in the DPM server.

Once the command is executed, key in the password.  This password is needed when you attach the untrusted server in the DPM.

The end result will be as follow.

SC-UNTRUST-15

Now switch to the DPM server.  Launch the console to begin the installation of the DPM agent.

SC-DPM2010-2

Select the Computer in a workgroup or untrusted domain and click Next.

SC-DPM2010-3

Key in the Computer name, the unique username and the password (the same unique username and password that was created in untrusted computer earlier).  Click the Add button, then click Next.

In the Summary screen, click Attach.

Once it’s completed, click Close.

SC-DPM2010-6

Lastly, remember to check the Password never expires in the local users in both the untrusted computer and also the DPM server.

SC-DPM2010-7

Thank you and hope this guide is useful.

keywords : Untrusted computer in DPM,  DPM supporting untrusted computer or workgroup, workgroup computer in DPM, DPM 2007, DPM 2010, DPM 2012.

Wednesday, June 13, 2012

DPM–Data Protection Manager Client (client recovery issue)

After deploying the DPM agent into a Windows 7 Client and patch with the latest QFE, now it’s possible for the end-users to recover their files or folders on their own.  This is one of the great features.

After doing the synchronization and recovery point, I hit the error.  Below is the message when I click on the Recovery tab in the Data Protection Manager Client in the Windows 7.

SC-W7-2

Resolution :

First of all I browse to the registry using REGEDIT in the client (which mine is the Windows 7 PC that has joined to the domain)

The path is as follow

SC-W7-7


HKEY_LOCAL_MACHINE\SOFTWARE\Microsoft\Microsoft Data Protection Manager\Agent\ClientProtection

Next I create a Key.  The Key should be Multi-String Value

SC-W7-8

The Key Name should be ClientOwners

SC-W7-9

Once created, then insert the ClientOwners value in the format as below.

SC-W7-10

Once it’s done, click OK then reboot the PC.

Once the PC is rebooted, launch the Data Protection Manager Client in that particular PC. Click on the Summary tab and click Sync Now.

SC-W7-13

Once that is completed, then switch to the DPM server and then initiate a recovery point.

SC-DPM2010-41

And when it’s completed in the DPM server, switch to the PC back.  Bring the Data Protection Manager Client, click on the Recovery tab.

In the Search for Recovery Point, click the search (just like a magnifying glass)

SC-W7-16

And now you can access the recovery from the DPM server to recover what was backup by the DPM for the client.

SC-W7-17

Thank you and hope this helps. 

Source from KB2465832

keywords : DPM found no recovery points which you are authorized to restore on the specified DPM server.  You can restore only those recovery points which you were an administrator at the time the backup was taken.  To restore other recovery points, contact your DPM administrator, or attempt to restore from another DPM. DPM 2010, DPM 2007, DPM 2012, client backup, DPM client, DPM workstation backup.