Monday, September 26, 2011

DPM–More of BMR (Error 0x80070057)

When doing the restoration for the BMR, it’s very important to note the following :

You can't do an image restore unless ALL the drives are exactly as they were. Meaning when I was using USB drive to initiate the recovery, it was counting that as a drive. So no go on using a jump drive to initiate the Windows Recovery Environment. That was what was the "the parameter is incorrect; 0x80070057" error.

So I figured a workaround.  Once you have selected the network driver to be installed and also the shared network drive where the DPM recovery image is stored, you then eject the thumb drive, before you click FINISH in the end for the restoration process.  That will do the trick.

Hope this helps you Smile.

keywords : The parameter is incorrect, error 0x800700. The system image restore failed,

Friday, September 23, 2011

DPM–Backing Up Hyper-V (Consistency Check Error)

Today I had an issue of backing up the Hyper-V through the DPM 2010.  The agent is installed into the Hyper-V host.  There’s also ample of space in the drive where the VHDs resides.  The same drive also caters for the snap shots. 

image

When I execute the Consistency Check it states that DPM failed to synchronize changes for Microsoft Hyper-V \Backup Using Child Partition Snapshots\VMServername on Hyper-VServerName because the snapshot volume did not have sufficient storage space to hold the churn on the protected computer (ID 30115 Details : VSSError : Insufficient storage available to create either the shadow copy storage file or other shadow copy data. (0x08004231F))

Status is Failed.

Therefore I carried out the steps below to have it working.

Step 1 (to be perform in Hyper-V Host)

  • Open the the Registry.
  • Add in the key :
    HKEY_LOCAL_MACHINE\SOFTWARE\Microsoft\Microsoft Data Protection Manager\Agent\UseSystemSoftwareProvider

SGSIN0950-SCR4


Step 2 (to be perform in the DPM Server)

  • From the Command prompt (Run as Administrator), key in the command to stop the DPM and restart the DPM services.  The command are as follow :

    net stop dpmra

                 then to start the DPM service

    net start dpmra

SGSIN0750-SCR103

Perform the Consistency Check once more.  Once it’s completed, then you can Create recovery point for restore.

Thank you and hope it helps you.

keywords : consistency check error, (ID 30115 Details : VSSError : Insufficient storage available to create either the shadow copy storage file or other shadow copy data. (0x08004231F)), DPM backing up Hyper-V error,

Thursday, September 8, 2011

DPM – What is Initial Store ?

When you use the DPM to backup a Hyper-V Server, there’s a check box for Initial Store. What is that … you may wonder.

The initial store contains the security permissions for Hyper-V’s Authorization Manager (AzMan).  This is an xml file located in %systemdrive%\ProgramData\Microsoft\Windows\Hyper-V\. You only need to perform a restore if this xml file becomes corrupted or is deleted. 

Backing up virtual machines and the initial store are independent. You only need to back up the initial store if you are using the Authorization Manager in Hyper-V and don’t want to lose your settings.

For more information on Hyper-V Authorization Manager visit: http://technet.microsoft.com/en-us/library/dd283076(WS.10).aspx

keywords : azman, Initial store in Hyper-V, DPM 2010, DPM, virtual machines.

Thursday, August 25, 2011

How to have Intergration Service working in Linux for Hyper-V

Today I’m going to share with you that you can have Linux install into the Hyper-V.

I’ve here is the Suse Linux 10 installed as a VM in my Hyper-V lab.

Need to take note, that the Network should be installed as Legacy Network Adapter during the provisioning of the Linux VM (if it’s not in the listed as supported Linux version in Hyper-V). Otherwise can use the Synthetic Network Adapter. 

In the version of Suse Linux 10, the Synthetic Network Adapter is use then.

Intergration Services

Once you’ve installed the Linux, you need to install the “Intergration Services”.

You can download it from here.

Download both the files (the Linux_IC_v2.EXE & Linux Integration Components Read Me.pdf)

1. Open Hyper-V Manager

2. In Hyper-V Manager, configure LinuxIC v2.ISO (located in the directory where you extracted the downloaded files) as a physical CD/DVD drive on the virtual machine.

3. As the root user, mount the CD in the virtual machine by issuing the following commands at a shell prompt:

# mkdir /mnt/cdrom

# mount /dev/cdrom /mnt/cdrom

4. Copy the Linux Integration Components to the virtual machine.

# mkdir /opt/linux_ic_rtm

# cp /mnt/cdrom/* /opt/linux_ic_rtm –R

5. As the root user, run the following command to install the synthetic drivers.

# /opt/linux_ic_rtm/setup.pl drivers

Getting Mouse Working

Next is to get the MOUSE working.

Download the ISO file from here.

1. Download and attach the .ISO file to a Hyper-V guest with the Linux Integration Components already installed.

2. Copy the contents of the .ISO to the desired directory

3. Run setup.pl with the inputdriver argument:

# ./setup.pl inputdriver

You might need to reboot the Linux VM if the mouse is not working.

Thanks to my comrade Kwan Thean Keong for the recommendation.

keywords : Linux, mouse not active in Hyper-V for Linux, Service Intergration for Linux in Hyper-V,


Tuesday, July 26, 2011

More on Bare Metal Restore (DPM 2010)

I’ve some query whether the DPM 2010 (BMR features) can be able to restore Physical to another physical which is not similar specs.

DPM 2010 utilizes Windows backup feature for both SystemState and BMR backups. The support for restoring to dissimilar hardware is defined by Windows and generally speaking, it not supported.  

BMR for Windows 2003 is only possible by using the DPM System Recovery Tool (SRT) a separate installable product that shipped on the DPM 2007 and DPM 2010 installation media.

In either case, nothing is preventing you from restoring to dissimilar hardware, but as noted it isn't supported and may not work 100% of the time (this most probably due to the different hardware drivers, which you may have to reinstall manually) .

For Windows 2003, it has been suggested is the right one like using the SRT for BMR backups. But for Windows 2008 and later OS versions, You can safely rely on the Windows Backup to restore on alternate hardware as well, it is much reliable than earlier Windows 2003 BMR / ASR (another method of System State Backup) recovery.

But some important points note here are, the recovery target has to have higher disk configuration than the backed-up one. If you are restoring a 32 Bit OS backup then you need to use 32 bit Setup/Install media/WINRE media(and same for 64 bit as well).

(WINRE stands for – Windows Recovery Environment)

To be able able to do successful BMR recovery, you have to backup all critical volumes using -allcritical options of Windows backup (DPM uses this option so all DPM BMR backups are BMR able, but it will not have data volumes backup).

Please note that A DPM server cannot protect itself for BMR.

Abstracts from Forum & TechNet

It’s not so straight forward however it’s not impossible.

keywords : BMR , Bare Metal Restore, DPM 2010, Restore from Physical to Virtual

Tuesday, July 5, 2011

DPM–How to Erase the Tapes Manually before expire to be reuse.

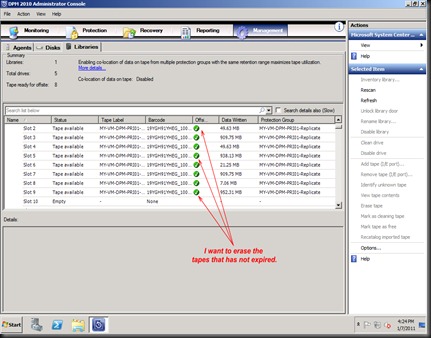
I come across one of the many questions, someone asked me if they can erase the tapes manually before it’s expired.  They said they wanted to do some testing to backup to tapes but somehow they can’t be able to find the erasure in the GUI.

So I’m going to share how it is done using PowerShell.
 MY-HV-TES-003-180

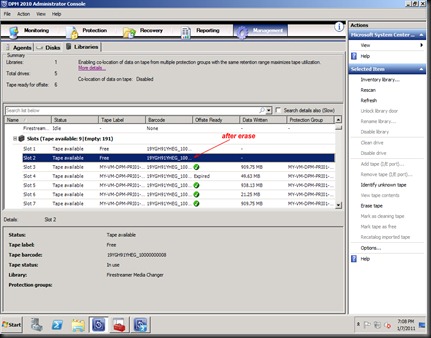
Launch the DPM console.  Navigate to the Management – Libraries .  Take note of it.  Slot 1 to Slot 9 .

Then now open a notepad.  Copy and paste the following (in yellow) to it :

param ([string] $DPMServerName, [string] $LibraryName, [string[]] $TapeLocationList)

if(("-?","-help") -contains $Args[0])
{
Write-Host "Usage: ForceFree-Tape.ps1 [[-DPMServerName] <Name of the DPM server>] [-LibraryName] <Name of the library> [-TapeLocationList] <Array of tape locations>"
Write-Host "Example: Force-FreeTape.ps1 -LibraryName "My library" -TapeLocationList Slot-1, Slot-7"
exit 0
}

if (!$DPMServerName)
{
$DPMServerName = Read-Host "DPM server name: "
if (!$DPMServerName)
{
Write-Error "Dpm server name not specified."
exit 1
}

}
if (!(Connect-DPMServer $DPMServerName))
{
Write-Error "Failed to connect To DPM server $DPMServerName"
exit 1
}

$library = @(Get-DPMLibrary $DPMServerName )
if ($library.count -eq 0)
{
Write-Error "Failed to find library with user friendly name $LibraryName"
exit 1
}

if (!$LibraryName)
{
$library | foreach {$_.userfriendlyname}
$LibraryName = Read-Host "Library name (cut & paste from above): "
if (!$LibraryName)
{

Write-Error "Library name not specified."
exit 1
}
}

if (!$TapeLocationList)
{
$tmp = Read-Host "Tape location: "
$TapeLocationList=$tmp.split(",")
write-host "Processing this slot list..."
$TapeLocationList
if (!$TapeLocationList)
{
Write-Error "Tape location not specified."
exit 1
}
}

foreach ($media in @(Get-Tape -DPMLibrary $library))
{
if ($TapeLocationList -contains $media.Location)
{
if ($media -is [Microsoft.Internal.EnterpriseStorage.Dls.UI.ObjectModel.LibraryManagement.ArchiveMedia])
{
foreach ($rp in @(Get-RecoveryPoint -Tape $media))
{
Get-RecoveryPoint -Datasource $rp.Datasource | Out-Null
Write-Verbose "Removing recovery point created at $($rp.RepresentedPointInTime) for tape in $($media.Location)."
Remove-RecoveryPoint -RecoveryPoint $rp -ForceDeletion -Confirm:$false
}

Write-Verbose "Setting tape in $($media.Location) as free."
Set-Tape -Tape $media -Free
}
else
{
Write-Error "The tape in $($media.Location) is a cleaner tape."
}
}
}


Save the file and rename it with the extension .ps1
MY-HV-TES-003-181

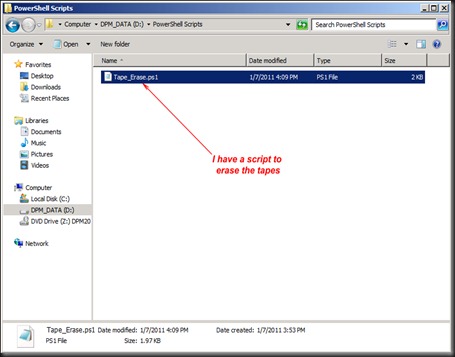
In my example here, I have a file name as Tape_Erase.ps1 and stored in the D:\PowerShell Scripts directory.
MY-HV-TES-003-193

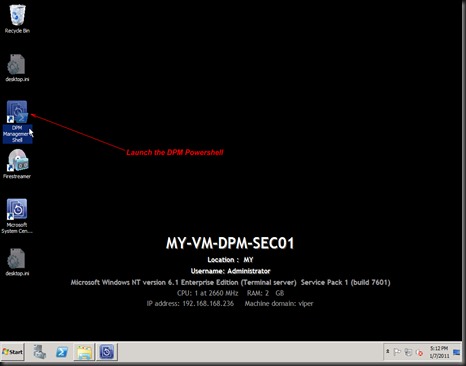
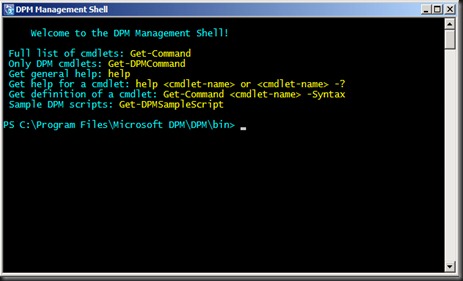
From the DPM console, I launch the DPM Management Shell (which is the PowerShell)
MY-HV-TES-003-194

Once launch you’ll be able to see the screen as above.
image

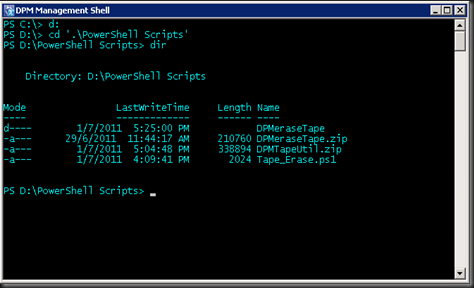
Then I change to the directory to where I save my PowerShell Script.  In my case I maneuvered to “D:\PowerShell Scripts”.
MY-HV-TES-003-204

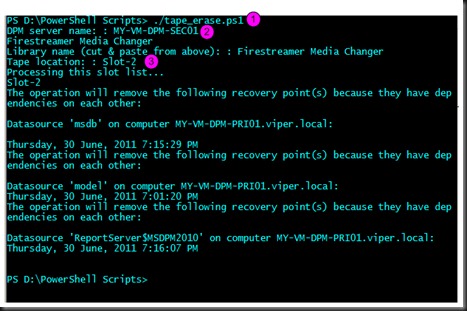
To execute the PowerShell script I keyed in with a ./

In my example my file is name as tape_erase.ps1.  To execute the script I type as ./tape_erase.ps1 .

Then next I keyed in the DPM server name (that is with the tape library).  In my case is MY-VM-DPM-SEC01

Then I key in the tape slot that I want to erase the tape.

I keyed in as Slot-2. 

Note : the ones in pink are the ones that needs to be change accordingly to your naming of your PowerShell script and your DPM settings.

Then  you’ll be able to see the process followed.
MY-HV-TES-003-208

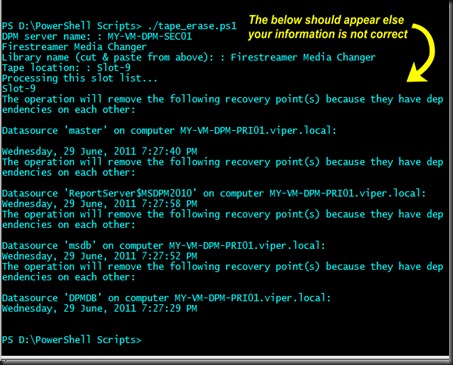
Another example as above, which I want to erase the tape in Slot-9.  e.g. In some cases the name of slot could be Slot-9 or Slot 9.  So it differs from one tape library to another.

Once it’s done, launch back the DPM Console.
MY-HV-TES-003-205

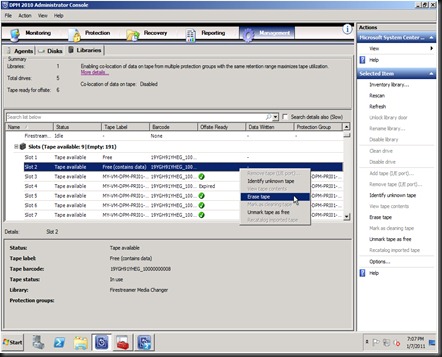
Click on the Management tab, then on the Libraries tab.

Select the tape that was erase earlier.  In my example is Slot 2.  <Right-click> on the tape and select Erase tape.
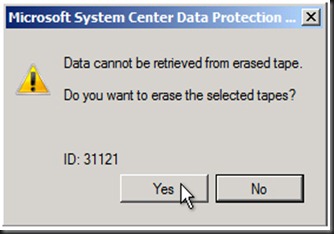
MY-HV-TES-003-206

Click Yes.

MY-HV-TES-003-207

Now the tape is erased and ready to be reuse.

Thank you and hope it helps you.  A special thanks also to Ruud Baars (of Microsoft) for sharing his scripting.

keywords : Data Protection Manager, erase tape before expire in DPM, how to erase tape manually in DPM, PowerShell script to erase tape manually in DPM.

Tuesday, June 28, 2011

DPM–Manual Transfer of Replica (from Server with DPM Agent to DPM Server through the WAN) for protected folder(s).


image

Today I would like to share with you a scenario that I’ve tested out. 

I have a file server which is located in a branch and is is installed with a DPM agent across a WAN.

In summary the servers are :

  • MY-VM-SVR-FS003 (File Server)
  • MY-VM-DPM-PRI02 (Primary DPM Server)

The assumption is that the DPM agent has been deployed to MY-VM-SVR-FS003.

Site 2

Next is the creation of the Protection Group.

my-hv-tes-002-99

During the process of creating the Protection Group, the Choose replica creation method, select Manual and click Next

my-hv-tes-002-104

In my example , The protection group created is to protect a folder in MY-VM-SVR-FS003 i.e. D:\for Backup_FS003

As the diagram above, it shows “Manual replica creation pending”.

Now, we’ll go to another site which MY-VM-SVR-FS003 is located e.g. Site 1 in my scenario.

Site 1

image

Copy the folder that was specified to an external media, e.g. external Hard Disk.

Once it’s done, we’ll go back to Site 2 with this copied media.

Back to Site 2

In the MY-VM-DPM-PRI02 , launch the DPM Console. Go to the Protection Group, select the protected group.  In my case is the MY-VM-SVR-FS003-Remote.

Note : login to server as LOCAL ADMINISTRATOR but launch the DPM console with the account that is part of the domain.  In my case I use MY-DPM-SVC domain account.

my-hv-tes-002-105

Click to view details.

my-hv-tes-002-106

<Right-click> on it and select Copy. 

my-hv-tes-002-109

Open up Notepad and copy into it for reference later.

Next, open command prompt.

my-hv-tes-002-114

Type mountvol .

my-hv-tes-002-115

Note the same volume between the notepad and the command prompt.

my-hv-tes-002-116

Highlight and copy.

my-hv-tes-002-117

type mountvol k:\ \\?\Volume{00e2fe0c-9e3b-11e0-86aa-00155da84d01}\

The command is to mount the volume into K Drive. 

note : What is shown in pink will be different from one DPM to another.

Next, open up Windows Explorer.

my-hv-tes-002-118

You’ll be able to see the K Drive.  Double click to expand it.

my-hv-tes-002-124

Expand the K Drive, and expand the folder.

Paste what has been copied from Site 2 to this particular directory (from the external media).

my-hv-tes-002-125

Copy and replace it.   Click Yes.

Once the copying is completed, go back to the command prompt.

my-hv-tes-002-128

Type mountvol k: /d to remove the the volume from K Drive.

my-hv-tes-002-132

In the DPM Console, Perform consistency check …

my-hv-tes-002-134

Very fast the consistency check is completed.  (it took a couple of seconds for my testing).  So now only the changes is replicated rather the entire chunk across the WAN.

Thank you and hope it helps you Smile.

keywords : DPM, Data Protection Manager, Replica, Replicate Data Manually, Replicate data offline in DPM.