Thursday, May 24, 2012

DPM–Creating DPM Protection group for Protecting Hyper-V Host Server 2008 R2 (Error ID : 31313)


Scenario : Installed DPM 2010 on a Hyper-V 2008 Server R2 SP1. 

The server name of this Hyper-V is B34.systemcenter.com

However when trying to create a protection group to protect the Hyper-V VM, it gives the error message (ID : 31313).  The server is already patched with the KB975354 as required by the error message.  Very weird !!  First time happening to me.

So after looking around found something that just works.

I launch the Microsoft SQL Server Management Studio (select the DPMDB database) and then key in the following in the New Query

use dpmdb
Update tbl_am_installedagent
Set ServerAttributes = 31
Where deleted = 0 and serverid in (select Serverid from tbl_am_server where serverName = 'b34.systemcenter.com')

Just replace the server name in the pink in colour with the correct server name (FQDN).  Execute it

The output as below :

image

After that I was able to create the protection group to Protect the VMs.  As I mentioned, it’s weird, very weird.  It doesn’t happen to my previous installations before.

Thank you and hope this helps you as it helps me.

Reading resource from here.

Key words : error ID 31313, KB975354 installed, Protecting Hyper-V with DPM 2010

Sunday, May 13, 2012

DPM–Cannot Deploy DPM Agent to Server under same domain

There’s some weird cases going on in one of my deployments.  The server is joined to the same domain as the DPM server, however when wanted to deploy the DPM agent, the assign protected server refused to accept it.

The protected server is a HP Server.

Therefore, did a test in the lab, there was no issue.  However in the production site, there was issue.

The following was carried out :

  • Uninstall the HP Server Tools and Management.
  • Deploy the DPM agent through the trusted way.
  • Install the HP Server Tools and Management

After the steps was carried out, then it works like a charm.  Hope this sharing benefits you.  Thank you.

keywords : DPM 2010, DPM 2012, Cannot backup domain.  Cannot deploy agent as trusted even though is in same domain as DPM server.

Tuesday, May 1, 2012

DPM–Critical Alert–SQL Log Backup job has detected a discontinuity in the SQL log chain for database


Today I’ve a scenario to share with you folks about the SQL Database backup (using DPM 2010 to backup).

The alert that I receive is as follow through the email :

image

After some investigation, found out that there’s a SQL Native Backup that is scheduled by the application team.  The DPM also uses the SQL backup engine before it’s data is transferred to the DPM.

It’s like 2 people trying to do the same job.  Coming to the extent, it might crash the database if not handled properly in long run.

Resolution :

Since the Application has a Native SQL backup scheduled to a folder e.g. F:\DB_Backup, then the protection group to protect this server was amended according to as below :

  • Removed the SQL Backup in DPM to protect the NOSTROLAB\QTNostro in the Protection Group
  • Add in backup to protect the database backup folder i.e. F:\DB_Backup in the Protection Group 

The above resolve the issue once and for all.

Hope the above helps you to resolve the issue of backing up the database with DPM.

keywords :  DPM tried to do a SQL log backup, either as part of a backup job or a recovery to latest point in time job. The SQL log backup job has detected a discontinuity in the SQL log chain for database since the last backup. All incremental backup jobs will fail until an express full backup runs. DPM 2010, DPM 2012, DPM 2007,  Critical Alert

Tuesday, April 24, 2012

DPM–DPM to DPM Replication with DPM 2010 / DPM 2012 through Firewall

There was a request by one of the end users that they would like to bring down the Dynamic Ports range. Currently the Microsoft default Dynamic Ports are from 1024-65535.

Therefore the following are requested to be lock down.

image

The following steps are needed to be perform for all the DPMs and also the protected servers.

Now open up the command prompt (run as Administrator).

image

View through the Component Services from the Administrative Tools.

DPMPRDSVR-05-13

Scroll down to Windows Management and Instrumentation and then right click to view the properties :

DPMPRDSVR-05-17

The click on the Endpoints Properties of the TCPIP.

Should be able to see as above.

Next is to amend the Registry for the Dynamic Port range.  Execute the command with regedt32 and not regedit

DPMPRDSVR-05-19

Scroll down to the HKEY_LOCAL_MACHINE\Software\Microsoft\Rpc\

image

Create the key Internet

Then navigate to HKEY_LOCAL_MACHINE\Software\Microsoft\Rpc\Internet to create the following

image

By end of the result, you should see the below.

image

Reboot the Protected Servers, Primary DPM & the Secondary DPM server

Configure the Firewall ports accordingly as below to allow the Primary DPM server and the Secondaray DPM server to communicate.  Also the firewall MUST allow the Secondary DPM server to communicate with the Primary Protected Servers by having the firewall ports configured too.

image

Thanks to the TechNet resource and also to Lai YS for his guide.

keywords : DPM to DPM replication, limit Dynamic ports, firewall configuration for DPM 2010 DPM 2007, Protected servers through firewall

Monday, April 16, 2012

Presenting iSCSI (in a VM) to Windows Server 8 (Physical Host)

I’m going to share with you today on how I present iSCSI LUN (running as a VM Server 2008 R2) to a physical Host that is running Windows Server 8 (Running Hyper-V).  This Windows Server 8 is also running as Hyper-V role and hosting the VM that earlier I mentioned running

In summary is as below :

image

image

Host : From Windows 8 Server  (Part 1)

Hyper-v-1

  • Create a folder and label it as VHDs

Hyper-v-3

  • Launch the Hyper-V.
  • Maneuver to the SC-Fileserver-iSCSI settings
  • Click on the SCSI Controller and add Hard Drive.

Hyper-v-5

  • Click New.

Hyper-v-6

  • Click Next >

image

  • Select VHDX and click Next


Hyper-v-8

  • Click Next >

Hyper-v-10

  • After creating the file, it should end with vhdx extension.  The location of the folder is the same as created in Windows Explorer.


Hyper-v-11

  • Put in the size of the virtual hard disk and click Next.

Hyper-v-12

  • Review and click Finish.

Hyper-v-13

  • Click apply and then OK.

Hyper-v-15

  • In the Windows Server 8, launch the iSCSI Initiator.

image

  • If the iSCSI server is not running, click Yes to start it.

Hyper-v-17

  • Key in the IP address of the iSCSI IP address of the server.  In my case is 10.52.52.16.
  • Click Quick Connect.

Hyper-v-18

  • Click Done.
  • Now we switch on to the server that is the iSCSI target.


iSCSI Target : SC-FILESERVER-iSCSI (Part 2)


SC-Fileserver-2

  • Launch the Server Manager in the SC-FILESERVER-ISCSI
  • Then scroll down to the Disk Managert
  • Initialize the disk (that was just presented)

SC-Fileserver-1

  • Launch the Microsoft iSCSI Software Target.

SC-Fileserver-3

  • Right-Click New Simple Volume and then quick format it.
  • Once it’s done click Finish.

SC-Fileserver-10

  • Launch the iSCSI Target in the VM
  • Scroll to the iSCSI Targets.
  • Right-click on the right panel and then select Create iSCSI Target.

SC-Fileserver-12

  • Key in a meaningful name and click Next.

SC-Fileserver-13

  • Click Browse.

SC-Fileserver-14

  • The step performed earlier, from the host has triggered an entry into the iSCSI initiators listing
  • Select it (in  my case is C02), then click OK.

SC-Fileserver-15

  • Click Next then click Finish.

SC-Fileserver-17

  • Click on Devices on the left panel
  • Then Right-Click on the right panel and select Create Virtual Disk.

SC-Fileserver-18 SC-Fileserver-19

  • Click Next.
  • Then click Browse.

SC-Fileserver-21

  • Key in the File with .vhd extension


image

  • Key in the Size of the VHD and then click Next.
  • Then click until Finish.

SC-Fileserver-31

  • In the iSCSI Target, select Devices
  • Select the Disk that was just recently presented, right-click and Assign/Remote Target.


SC-Fileserver-32     SC-Fileserver-33

  • Click Add
  • Select the Target that was created.
  • In my example is Hyper-V-DPM.  After selecting click OK.
  • Now it’s back to the Host (physical).


Windows Server 8 Host Server (Part 3).

Hyper-v-21

  • In the iSCSI inititor, click on Refresh.

Hyper-v-22

  • Then click Connect.

Hyper-v-24

  • Click OK.

image

  • Now it’s ready for DPM usage.

image

  • Now the storage is ready for Hyper-V Host to use.  In my case, this LUN has been dedicated for DPM only.

Hope the above helps you for your testing or Lab environment.

      note : Hyper-V Windows 8 DPM storage, DPM 2012 storage provision from internal iSCSI or storage.

      Tuesday, March 27, 2012

      DPM–How to force expire tape


      Sometimes we hit in the situation that we’re FORCE to expire the oldest tape due to insufficient media for the backup.  This can’t be done from the DPM Console but with DPM Powershell Script.

      Now copy the text that is the yellow wording below to a Text File.

      ----------------------------- Start of Script --------------------------------

      param ([string] $DPMServerName, [string] $LibraryName, [string[]] $TapeLocationList)

      if(("-?","-help") -contains $Args[0])
      {
      Write-Host "Usage: ForceFree-Tape.ps1 [[-DPMServerName] <Name of the DPM server>] [-LibraryName] <Name of the library> [-TapeLocationList] <Array of tape locations>"
      Write-Host "Example: Force-FreeTape.ps1 -LibraryName "My library" -TapeLocationList Slot-1, Slot-7"
      exit 0
      }

      if (!$DPMServerName)
      {
      $DPMServerName = Read-Host "DPM server name: "
      if (!$DPMServerName)
      {
      Write-Error "Dpm server name not specified."
      exit 1
      }

      }
      if (!(Connect-DPMServer $DPMServerName))
      {
      Write-Error "Failed to connect To DPM server $DPMServerName"
      exit 1
      }

      $library = @(Get-DPMLibrary $DPMServerName )
      if ($library.count -eq 0)
      {
      Write-Error "Failed to find library with user friendly name $LibraryName"
      exit 1
      }

      if (!$LibraryName)
      {
      $library | foreach {$_.userfriendlyname}
      $LibraryName = Read-Host "Library name (cut & paste from above): "
      if (!$LibraryName)
      {

      Write-Error "Library name not specified."
      exit 1
      }
      }

      if (!$TapeLocationList)
      {
      $tmp = Read-Host "Tape location: "
      $TapeLocationList=$tmp.split(",")
      write-host "Processing this slot list..."
      $TapeLocationList
      if (!$TapeLocationList)
      {
      Write-Error "Tape location not specified."
      exit 1
      }
      }

      foreach ($media in @(Get-Tape -DPMLibrary $library))
      {
      if ($TapeLocationList -contains $media.Location)
      {
      if ($media -is [Microsoft.Internal.EnterpriseStorage.Dls.UI.ObjectModel.LibraryManagement.ArchiveMedia])
      {
      foreach ($rp in @(Get-RecoveryPoint -Tape $media))
      {
      Get-RecoveryPoint -Datasource $rp.Datasource | Out-Null
      Write-Verbose "Removing recovery point created at $($rp.RepresentedPointInTime) for tape in $($media.Location)."
      Remove-RecoveryPoint -RecoveryPoint $rp -ForceDeletion -Confirm:$false
      }

      Write-Verbose "Setting tape in $($media.Location) as free."
      Set-Tape -Tape $media -Free
      }
      else
      {
      Write-Error "The tape in $($media.Location) is a cleaner tape."
      }
      }
      }

      ----------------------------- End of Script ---------------------------------


      To Expire the tape

      • Rename the file save text file to force_expire.ps1
      • Put the file into your DPM bin directory.  In my case is D:\Program Files\Microsoft DPM\DPM\bin
      • Launch the DPM Management Shell


      MYCBJ0751-SCR365


      • Type .\Force_Expire.ps1 and press enter in the DPM Management Shell then press enter.


      MYCBJ0751-SCR366

      • Key in the DPM server name and press enter.


      MYCBJ0751-SCR368


      • The Tape Library is display.  Copy and paste and press Enter.


      MYCBJ0751-SCR373

      • Key in the slot of the tape that you wish to expire and press Enter.  The e.g. like Slot-<tape slot>.

      image

      • Once it’s completed, go back to the DPM Console.
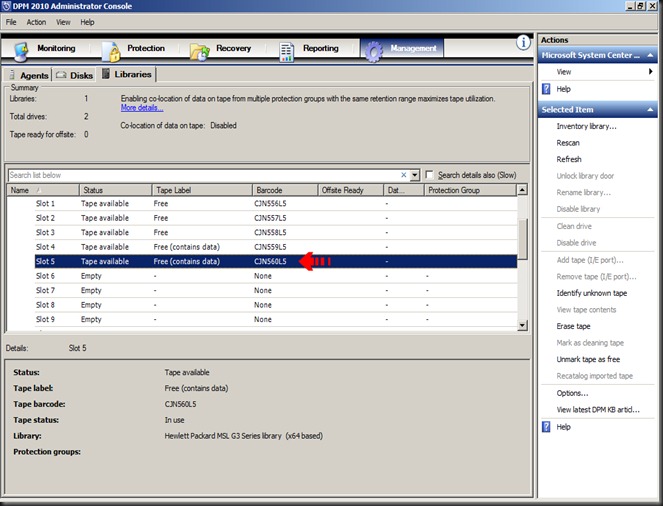
      MYCBJ0751-SCR378

      • Now the tape is ready to be re-use.


      Hope this helps you.

      Thank you.

      keynote : DPM 2010 expire tape, force expire tape, tapes to expire, expire force. tapes to expire in DPM 2010.