Wednesday, December 17, 2014

How to Write into Event Viewer (using PowerShell)

I’m into a situation that I want to write the activity that was carried out into the Event Viewer (say the Application).

I’ve a PowerShell script but has incorporated the following in the beginning and the end of the script.

First I need to register the event into the server’s event viewer.  I call it as “InFront Maintenance”

In the PowerShell, I only execute once to record it down.

New-EventLog –LogName Application –Source “InFront Maintenance

Once it’s registered, then I incorporated the following into my beginning of my script the activity that I need to carry out. 

Note : If you do not register, the next line you execute to write to event viewer, you’ll definitely hit the error.  This is because the “SOURCE” is not registered.

Write-EventLog –LogName Application –Source “InFront Maintenance” –EntryType Information –EventID 1 –Message “Maintenance Spoke A.

So in the event viewer you’ll be able to see something like this

image

At the end of my script I indicate as follow :

Write-EventLog –LogName Application –Source “InFront Maintenance” –EntryType Information –EventID 1 –Message “End Maintenance Spoke A

In the event viewer you’ll see like this :

image

So to summary it :

To register for the first time the event (just once)

  • New-EventLog –LogName Application –Source “InFront Maintenance

Insert beginning on my PowerShell Script

  • Write-EventLog –LogName Application –Source “InFront Maintenance” –EntryType Information –EventID 1 –Message “Maintenance Spoke A.

Insert at the end of my PowerShell Script

  • Write-EventLog –LogName Application –Source “InFront Maintenance” –EntryType Information –EventID 1 –Message “End Maintenance Spoke A

Just change the Pink for your event, and the Yellow for the General Descriptions.

Thanks to the Scripting Guy Site , Ed Wilson!!

keynote : How to write to Event Viewer with powershell, using powershell to write event,event log, application log event viewer, eventviewer with PowerShell, record activity into event viewer

Friday, December 12, 2014

Drag and Drop Files into VM

I’ve a Windows 2012 R2 running Hyper-V.  A VM is running inside this Hyper-V but I need to copy some of the files into the VM.  One of the reason for not connecting to network is that the VM is cloned and I do not want to clash with the Production VM.

There’s a way that you can Drag and Drop into the VM from the Hyper-V Host into the VM.

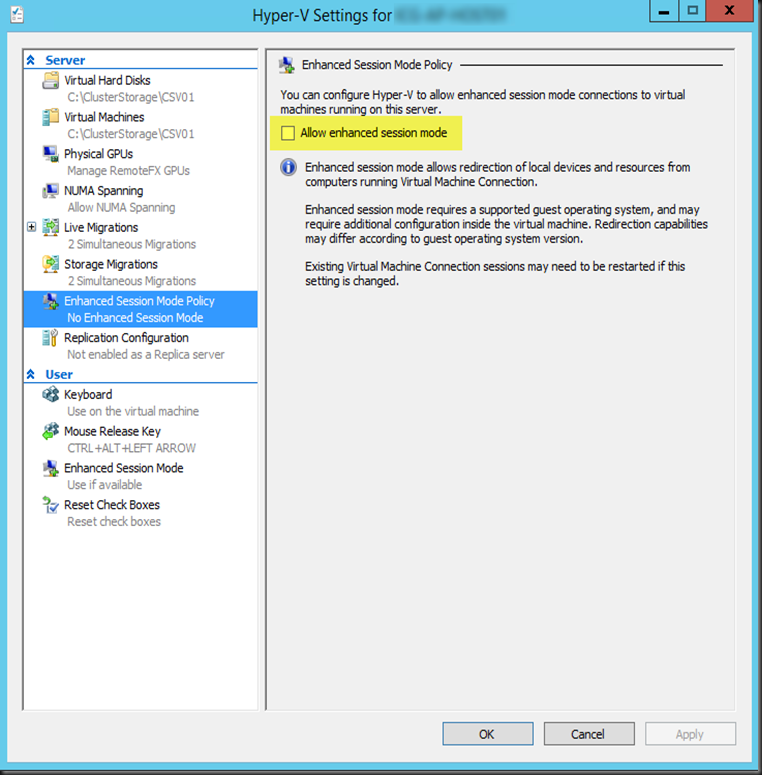
Open the Hyper-V Settings – Click on the Enhanced Session Mode Policy.

Mark a check in the “Allow enhanced session mode” and click OK.

SNAGHTML64b88ea

Once that is done, you can drag from your Hyper-V Host into the VM desktop or any folder that you want to copy into the VM.

Thank you and hope that helps.

keyword : drag and drop files, folders into VM that is not connected to network in Hyper-V host.

Thursday, December 11, 2014

Extending VHD / VHDX Volume

I have prepared the VHDX (or VHD in some cases) and it’s SYSPREP.  Now my C Drive is only 60GB but I would like to extend the hard disk to 100GB, to enable for me to install other applications on the C Drive.

I’m going to share how I do it.

My VHD is in the external drive (USB connected Hard Drive). 

Location E:\VHD\Demo

The VHD File is WIN81-ENT-x64-SYSPREP1.vhdx

image

I mount the drive to check on the space

image

As you can see it’s about 60GB. I’ll unmount and show the steps using DISKPART command

The command as follow :

  • Open Command Prompt with Administrator rights
  • Key in DISKPART
  • Next key in Select the Disk of where your VHD is located. For me is located at E Drive.  Therefore I key in as select vdisk file=”E:\VHD\Demo\WIN81-Ent-x64-SYSPREP.vhdx” 
  • Next to expand the TOTAL size of the VHD. I key in as expand vdisk maximum=100000
  • Next key in attach vdisk
  • Then key in list disk to view. If it’s not online then key on ONLINE DISK. It should be online automatically.

image

  • Next key in list volume
  • As you can see the volume shows as still 60GB
  • I key in as select volume 6
  • Key in extend
  • Key in list volume to see the new size

image

  • Opening up the attach disk, now it’s close to 100GB

image

Now I’m done, I would like to detach the VHD

Back to the DISKPART command prompt

  • Key in detach vdisk
  • Key in exit to quit diskpart from command prompt

image

In summary, I’ve keyed in as follow :

  • DISKPART
  • select vdisk file=”E:\VHD\Demo\WIN81-Ent-x64-SYSPREP.vhdx 
  • expand vdisk maximum=100000
  • attach vdisk
  • list disk
  • list volume
  • select volume 6
  • extend
  • list volume 
  • detach vdisk
  • exit 

Command in diskpart is in GREEN, you change those values in PINK 

Hopefully the steps are helpful.

keywords : diskpart, extend vhdx, extend vhd, expand volume size